Lumper Log
CWT weight and hourly labor tracking for the contingent lumping crew. This guide covers every function of the app, step by step, for each access profile: Associate, Supervisor, and Admin.
How pay works in the app
Crew are paid CWT (hundredweight) while checked into a load, and hourly for the rest of their clocked-in shift. The app separates the two automatically: time on a load counts as CWT work, and the remaining shift time is hourly, which supervisors break down by labor category. All time rounds to the quarter hour: 7 minutes or less rounds down, 8 or more rounds up (6:07 → 6:00, 6:08 → 6:15). Overtime applies past 40 hours in a week; CWT earned past 40 hours pays at the overtime CWT rate.
Access profiles
| ROLE | WHAT THEY SEE | WHAT THEY CAN DO |
|---|---|---|
| Associate | Their own load board only | Log in with PIN (clocks them in), accept assigned loads, check in and out of loads, see their own week: CWT, hours, and OT hours |
| Supervisor | Home, Floor board, Load Management, People, Reports (Labor mix, Load history), Help | Everything an associate can, plus: post and open loads, assign crew, approve loads, categorize labor, manage the roster, PINs and roles, submit the week |
| Admin | Everything, including Reports → Billing and the Setup menu | Everything a supervisor can, plus: billing summary, pay and charge rates, labor task rates, database sync, approving and locking weeks |
Workflow map
What happens to a load, and who does each part, from the moment a trailer is entered to the moment the week is locked for payroll.
Load status as it moves:
Finding your way around
Supervisors and admins see a condensed menu bar. Most items are parent menus that open a short list; two go straight to a page.
| MENU | WHAT IS UNDER IT |
|---|---|
| Home | Open-items dashboard. Goes straight there. |
| Floor board | The live dock display. Goes straight there. |
| Load Management | Log a load · Load approvals (with waiting count) |
| People | Crew week · Crew roster · Associate view |
| Reports | Billing (admin) · Labor mix · Load history |
| Setup (admin) | Rates · Accounts & carriers · Labor tasks · System |
| Help | This training guide inside the app. |
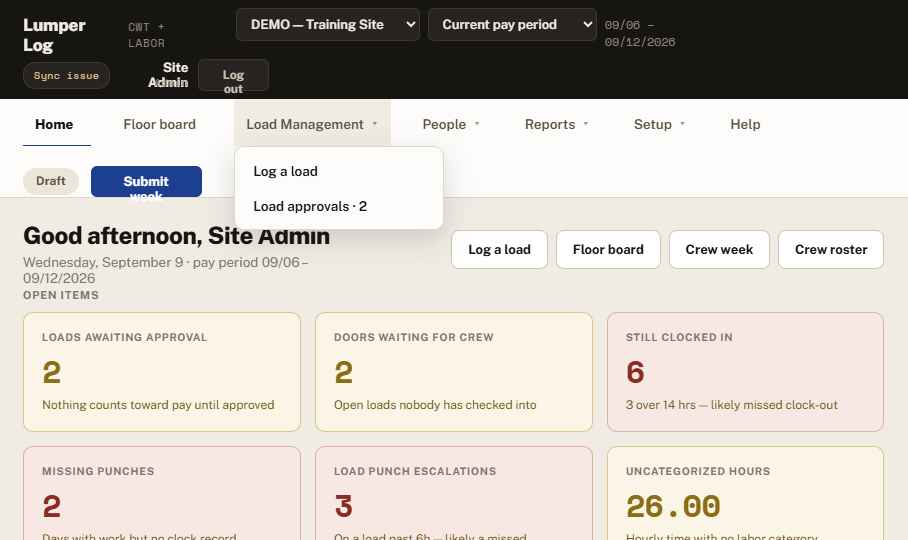
Above the menu sit two selectors that apply to every page at once: the site (admins only — supervisors see their site as fixed text) and the pay period. Changing the period changes what Crew week, Billing, Load history, and approvals report on. A sync chip shows when the app last saved to the shared database.
1 · Associate guide
ASSOCIATE
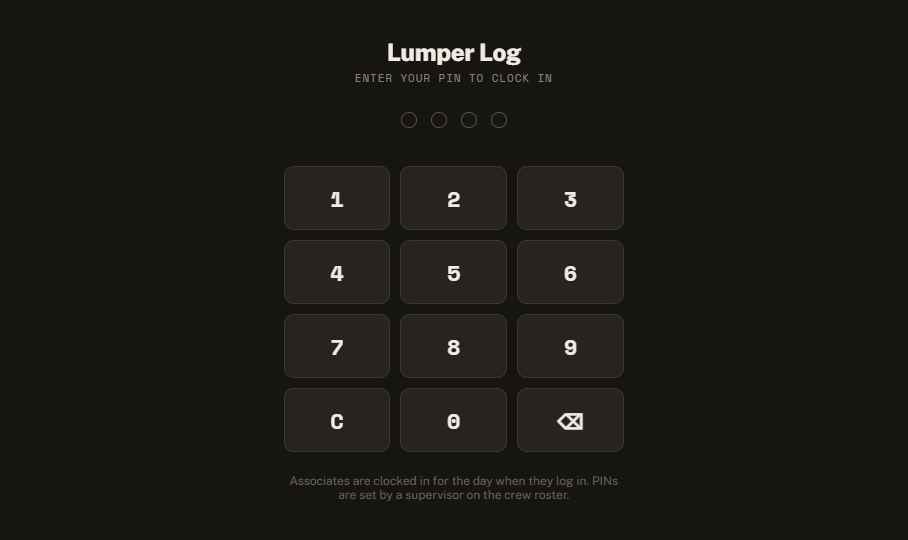
Logging in (this clocks you in)
Accepting an assigned load
If a supervisor assigned you a load, a card appears right after login: LOAD ASSIGNED TO YOU with the account, trailer, door, and weight.
Checking in and out of loads
Punch reminders
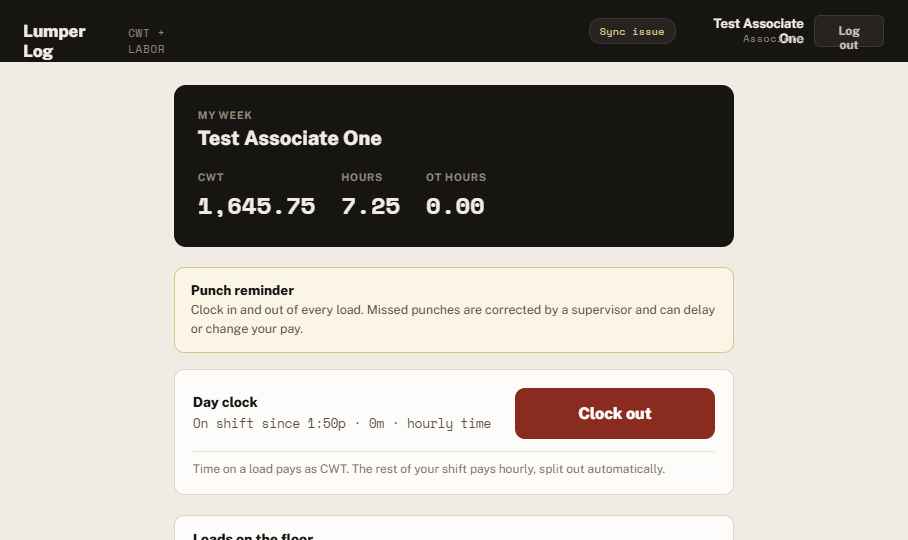
A notice sits at the top of your board reminding you to clock in and out of every load. If you stay checked into one load past the site’s limit (set by an admin, six hours by default), the notice turns red and names the load: your supervisor is notified and has to correct your time by hand.
Your day clock and pay
- The Day clock card shows your shift status: when you clocked in, how long you have been on shift, and whether you are currently on a load (CWT) or on hourly time.
- My week shows your CWT, hours, and overtime hours for the week. Pay figures are not shown on the associate screen.
- Weight on a load splits evenly across everyone checked into it.
Logging out
2 · Supervisor guide
SUPERVISOR
Logging in
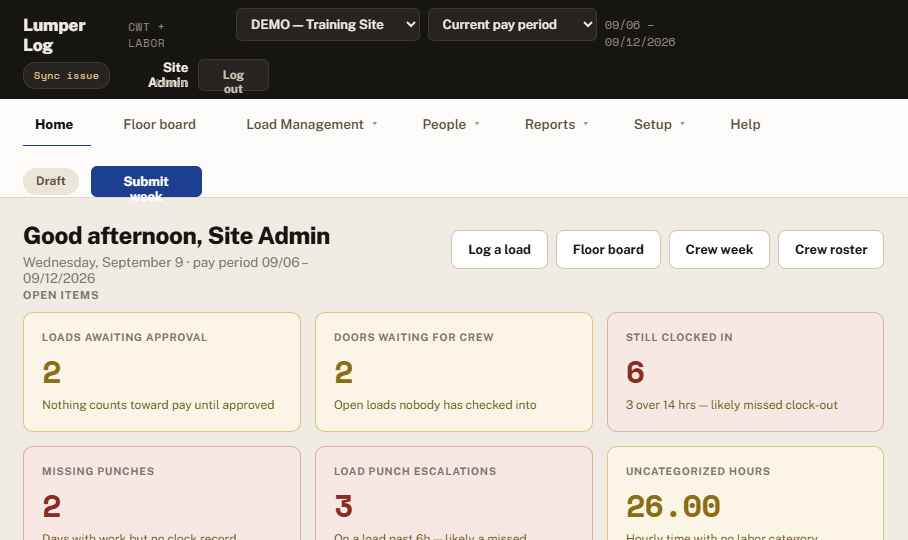
Enter your supervisor PIN on the PIN screen. You land on the Home page: a greeting, the pay period, and a grid of open-item tiles — loads awaiting approval, load punch escalations, doors waiting for crew, people still clocked in, missing punches, and uncategorized hours. Amber tiles need attention, red tiles look wrong, grey tiles are clear. Tap any tile to jump to the screen that fixes it. The week status panel at the bottom carries the Submit action. The pay period selector and status pill sit in the dark header; supervisors see their own site only.
Load Management → Log a load
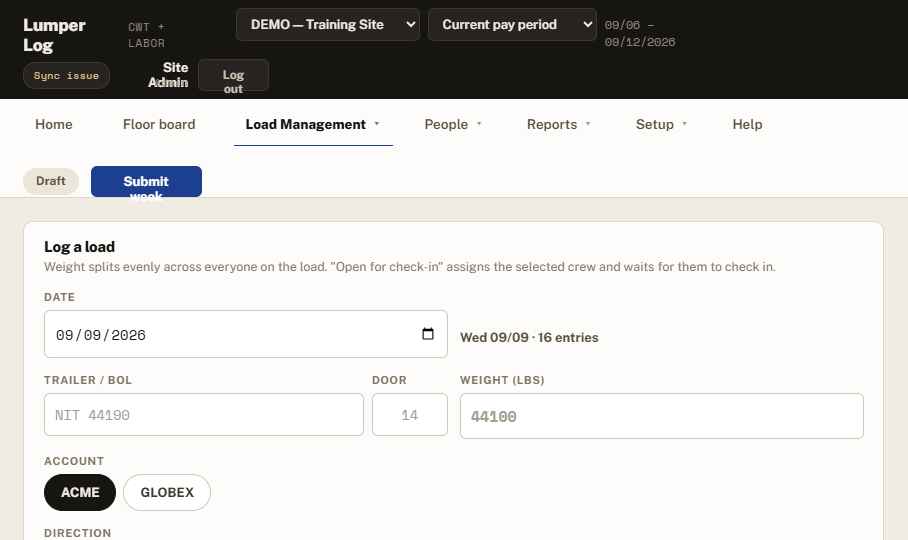
Log a load — categorizing remaining labor
Hourly time comes from the shift clock automatically. Your job is to say what that hourly time was. The Categorize remaining labor form lists only crew who still have unclassified hours for the selected day, with the amount on each chip (e.g. “2.75h left”).
Load approvals — the QC check
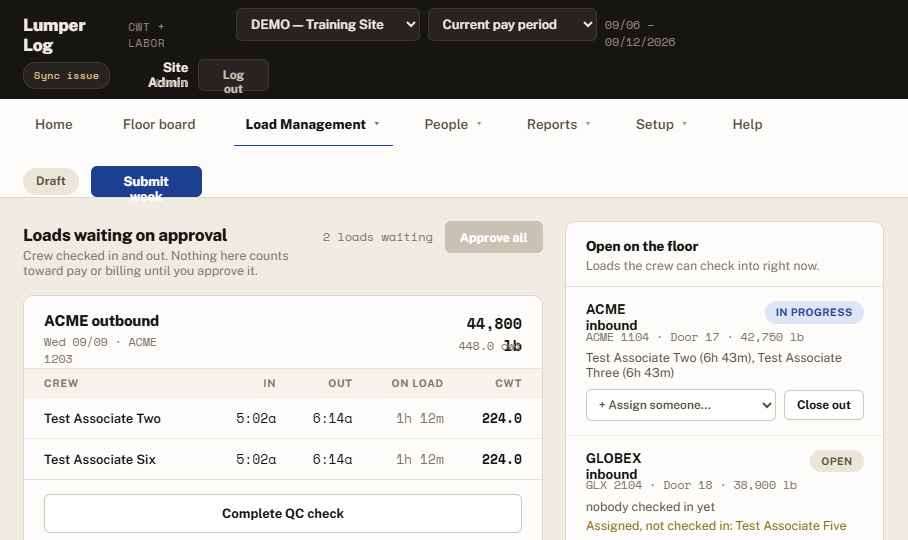
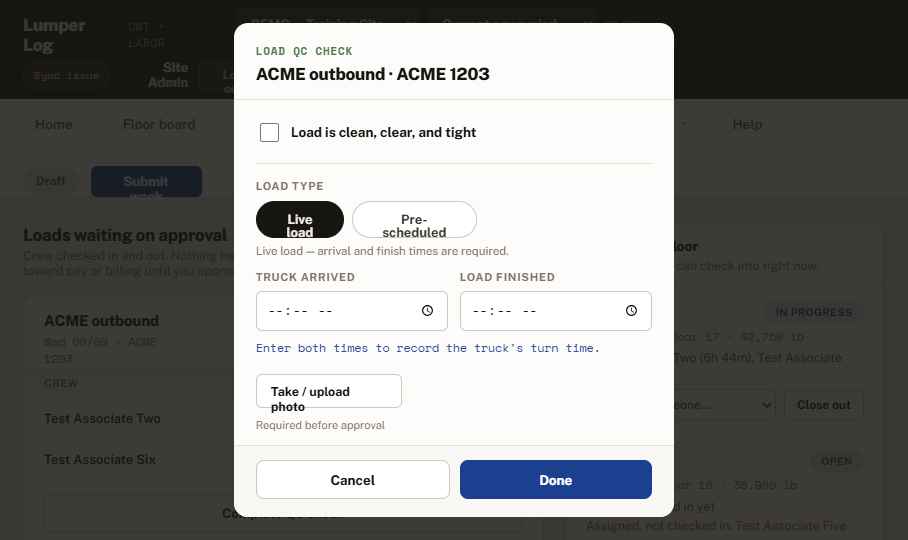
When the last associate checks out of a load, it lands here. Nothing counts toward pay or billing until approved, and nothing can be approved until the QC check is complete.
Floor board (wall display)
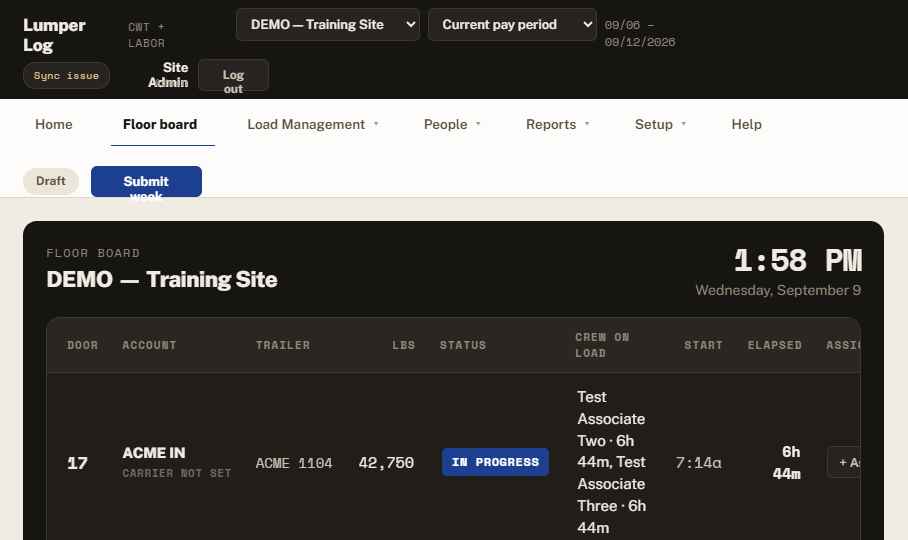
Put this on the dock TV. One row per open door: door, account with the carrier and (on outbound) a LIVE LOAD or PRE-SCHEDULED tag, trailer, weight, status, who is on it with running time, start, and elapsed. Amber rows are waiting for crew. The ASSIGN dropdown in each row assigns associates to that load — whether they are clocked in or not; they confirm the assignment when they log in. Clicking a highlighted ✓ name removes them.
People → Crew week
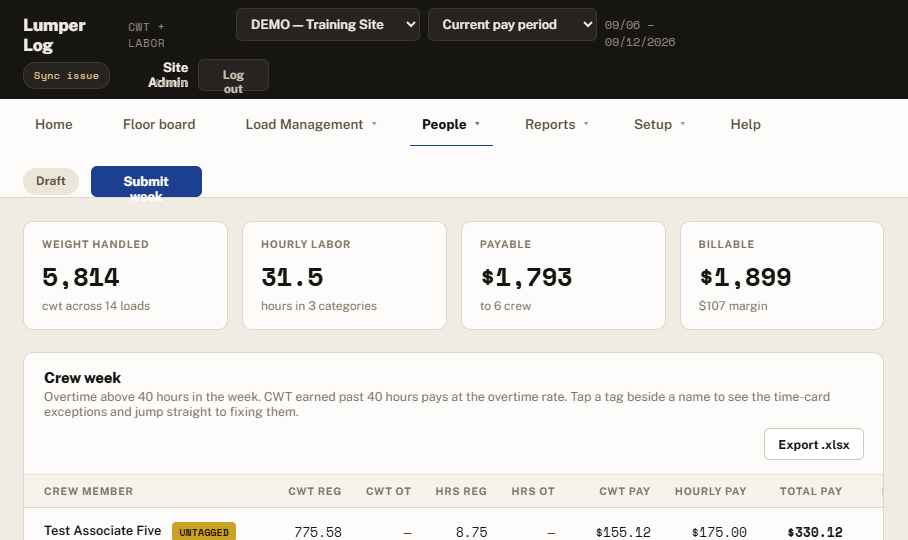
- One row per person: CWT regular/OT, hours regular/OT, CWT pay, hourly pay, total pay (2 decimals, quarter-hour rounded).
- Amber rows are within 4 hours of overtime; red rows are past 40 hours.
- Export .xlsx downloads the payroll workbook: a Payroll Totals tab plus one tab per crew member, in the same layout as the paper workbook.
- Exception tags beside a name (NO OUT, DUP, NO CLOCK, OVER, UNTAGGED) flag time-card problems. Tap the tag to see each issue and jump straight to Fix time card.
- Days clocked in with no clock-out pay nothing until corrected, so a forgotten punch can never inflate pay.
Fixing a time card (Edit time)
Every Crew week row has an Edit button in the TIME column. The timesheet shows each day’s clock-in and clock-out (editable), hours on loads, and the hourly remainder. Days with several shift records show in red and merge into one corrected span when you save. Below the clock table, an Untagged time panel lists each day still needing a labor category — tap a category chip to assign it, leave the hours box blank to tag the full remainder. A manual override adds hours where no clock record exists. The note field is optional; every save writes the time clock audit trail — who, when, each change, and the note — shown at the bottom of the same dialog.
Correcting time on a load
Missed punches on a load are fixed from the load itself, not the time card.
Load history and audit trail
Every load keeps a complete record: who created it, assignments, check-ins and check-outs, QC entries, edits (field by field, old value to new), approvals, cancellations, and restores — each stamped with a name and time.
- Cancelling never deletes. A cancelled load moves to the Cancelled archive at the bottom of the Log day feed, stops counting toward pay and billing, keeps its history, and can be restored.
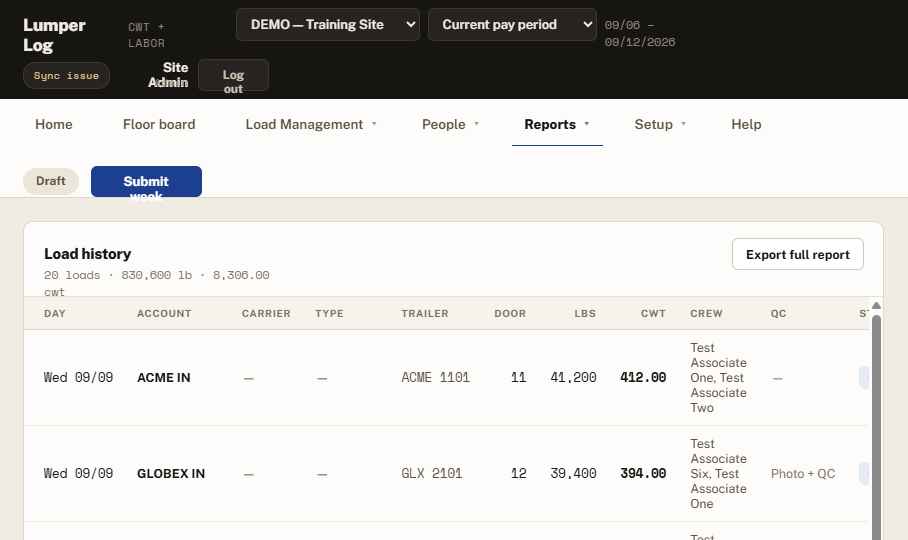
- Reports → Load history lists every load in the pay period — day, account, carrier, type, trailer, door, weight, CWT, crew, QC evidence, and status — with an Open link per row.
Printable load reports
Three buttons produce the same printable document, which opens in a new tab with a Print / save as PDF button. Each load prints its details, carrier, load type, live turn time, the load photo, every person’s in/out and CWT share, and the full audit trail.
- Export report in a load’s History popup — that one load.
- Day report in the Log day feed header — every load on the selected date, cancelled ones included.
- Export full report on Load history — the whole pay period. Billing has the same thing as Export invoice backup for posted loads.
People → Crew roster
Submitting the week
3 · Admin guide
ADMIN
Admins see everything supervisors see, plus Billing and the Setup menu, and handle the week’s final approval. Only admins can switch sites in the header, move people between sites on the roster, and use the database sync card. A sync chip in the header shows “Synced” with the last sync time on every screen.
Reports → Billing
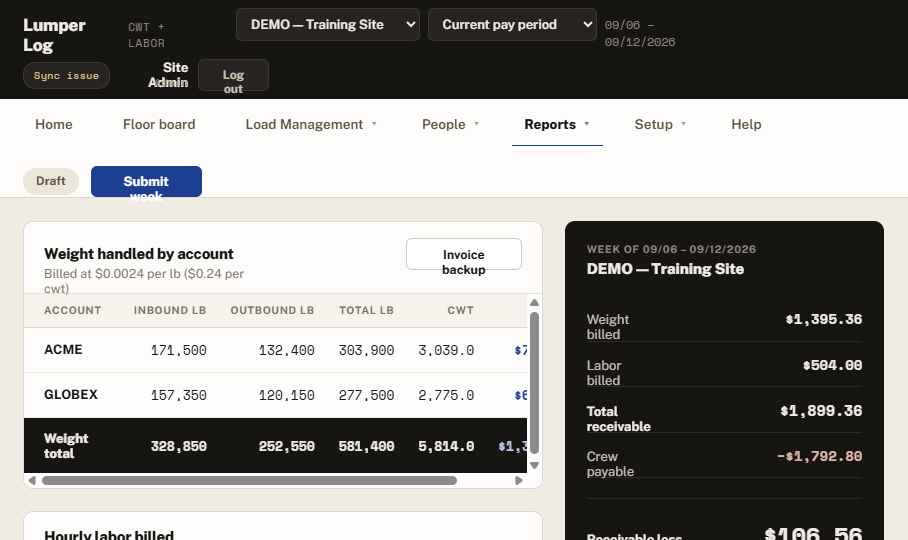
- Weight handled by account: inbound/outbound pounds, CWT, and charge per account at the site’s per-pound rate.
- Hourly labor billed: hours by category at each task’s bill rate, including any untagged shift time.
- The dark panel totals receivable, subtracts crew payable, and shows receivable less payable for the week.
- Invoice backup generates the per-account detail for customer invoicing.
Approving and locking a week
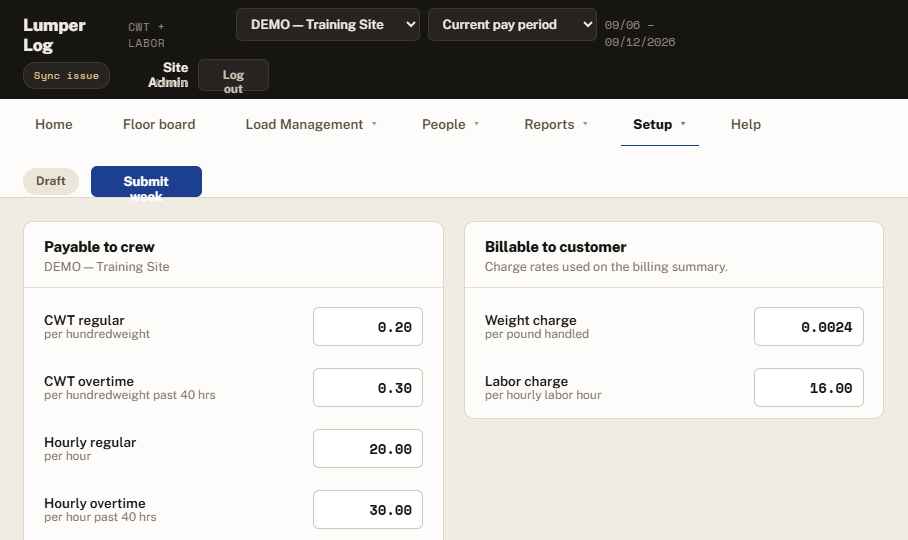
Setup → Rates
- Payable to crew: CWT regular and overtime (per hundredweight), hourly regular and overtime. Two decimals.
- Billable to customer: weight charge per pound (4 decimals) and labor charge per hour.
- Rates are per site — switch sites in the header to edit the other site’s rates.
Setup → Accounts & carriers
Both lists work the same way: rename in place, add with the field at the bottom, remove with the link on the right. Anything already used on a load cannot be removed — rename it instead so past weeks and billing still add up. Account names appear on the load form, billing, and reports; carriers appear on the load form, floor board, and reports.
Setup → Labor tasks
The categories the log offers and the labor mix charts, each with an optional per-task bill rate, an active toggle, and delete (blocked once hours are logged against it).
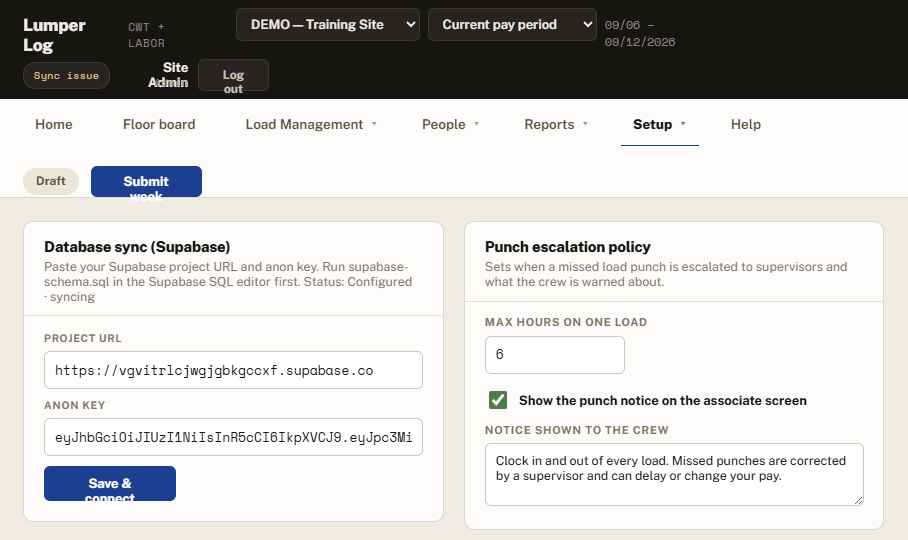
Setup → System
- Database sync (Supabase) — project URL and anon key. Already configured for this deployment; every user syncs automatically.
- Punch escalation policy — the maximum hours anyone may stay checked into one load before it is escalated, whether the crew sees the punch notice, and the wording of that notice.
- Load-photo Drive upload — optional Google Apps Script Web App URL. When set, every approval photo posts to your Drive folder automatically.
- Clear all records — wipes loads, shifts, hourly entries, and audit history for a clean start. Keeps roster, PINs, roles, rates, and tasks. The DEMO site keeps its sample data.
Database sync (Supabase)
4 · Quick reference
Rules the app enforces
| RULE | WHAT IT MEANS |
|---|---|
| Login = clock in (associates) | The shift clock starts at PIN entry and drives hourly pay. |
| No load work off the clock | Associates must be clocked in to check into a load. |
| Assigned load comes first | An unaccepted assignment blocks check-in to any other load. |
| Approval before pay | Checked-out loads count nowhere until a supervisor approves. |
| Even CWT split | Load weight divides evenly across everyone checked in. |
| Quarter-hour rounding | All time rounds to 0.25h: ≤7 min down, ≥8 min up. |
| Time edits are audited | Every time-card change records who, when, each change, and an optional note. |
| No clock-out = no pay | A day left open pays 0 hours until a clock-out is entered on the time card. |
| No QC, no approval | A load cannot post without the clean/clear/tight check and a load photo; outbound loads also need a type, and live loads need arrival and finish times. |
| Cancelling archives | Cancelled loads keep their history and can be restored; they never count toward pay or billing. |
| Load punch escalation | Staying checked into one load past the site limit flags the crew member and alerts supervisors on Home. |
| Names in use stay | Accounts, carriers, tasks, and people with records can be renamed or deactivated, never deleted. |
| OT over 40 hrs/week | Hourly OT rate applies past 40; CWT past 40 pays the OT CWT rate. |
| Locked week = read-only | After office approval nothing can change until reopened. |
Practicing safely
The DEMO — Training Site is a full sandbox with its own crew and a loaded sample day: sixteen loads, live and pre-scheduled outbounds, loads awaiting approval, open doors, and a punch escalation. Admins switch to it with the site selector; the training account’s PIN is 0000. Nothing done there touches real pay or billing.
Who to call
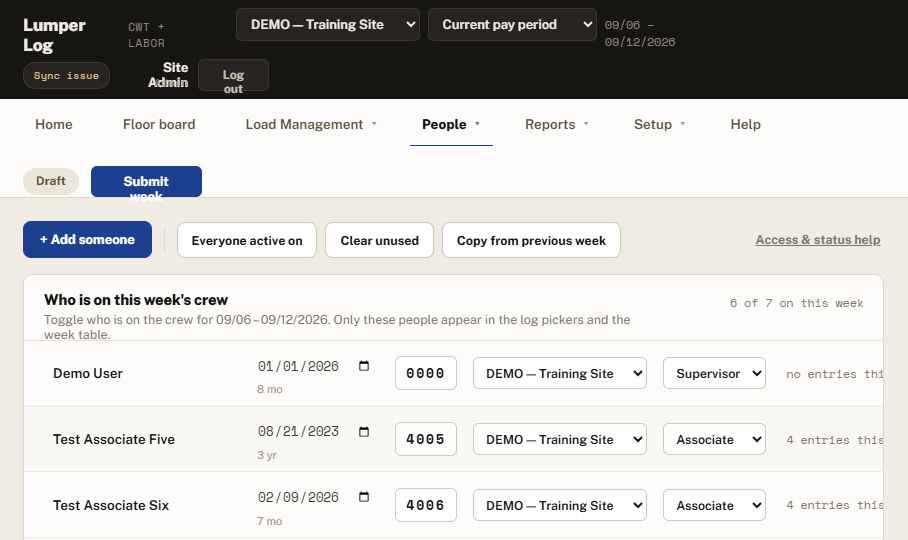
- Wrong PIN / locked out: your site supervisor (People → Crew roster).
- Load posted wrong: supervisor can remove it from the day feed and re-post while the week is unlocked.
- Rate or billing question: site admin (Setup → Rates, Reports → Billing).